
That piece could use some serious TLC. I mean, it’s definitely a piece. (A piece of something).
Donate it? The thrift store already rejected it. Give it to a friend? No, you value that friendship.
Perhaps you should breathe new life into the rustic remains of what once inspired interior designers everywhere. The future of your furniture depends on it.
Your custom-built side table.
All joking aside, if you built a brand new side table from dimensional lumber at Home Depot or Lowe’s, it’s time to beautify it as if Pinterest depended on it.
Here are the building plans for Ana White’s Reclaimed Wood Look Bedside Table. We used this tutorial to create a little 3-drawer side of the bed storage unit for socks and such. Cheers to the gagillion plans she generously shares with the entire internet!
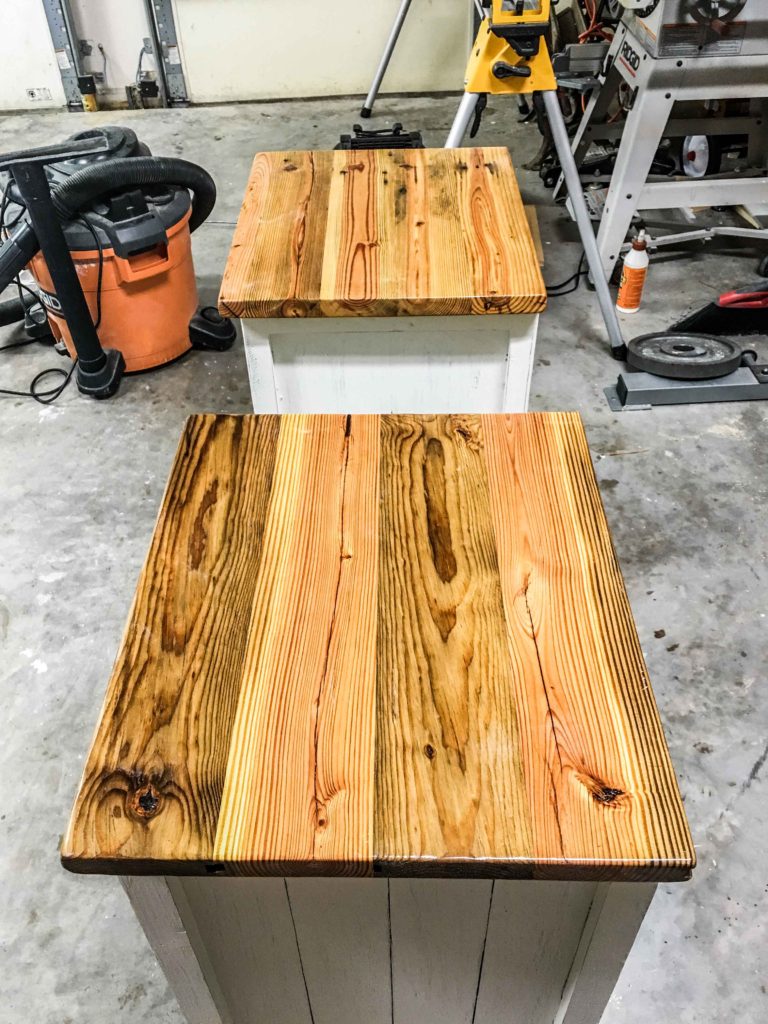
The high-contrast finish.
We LOVE the juxtaposition of light to mid-tone color.
The side table top is made of rustic-grade heart pine pulled from a 200 year old bourbon distillery floor. To help the age-old wood shine, we only added a mixture of oil and urethane for a natural look. The oil saturates the yellow, orange and red pigments of the pine, while the urethane creates a “plastic” barrier for protection against moisture, wear and tear.
Note: this tutorial is designed for any furniture piece with a raw wood top and painted OR stained base (legs + apron).
Against the richly colored top, the white legs and drawers provide a visual contrast. The mid-tone brown wood stain underneath the white paint sporadically shows through every scuff, sandpaper mark and distressed corner and edge.
The greatest benefit of rustic design? More use means more character. Cheers to never worrying if you scuff it while moving or forget to use a coaster.
It’s about time to give the furnishing a little fashion. Here’s the breakdown of your wood finishing adventure.
Table of contents.
- Materials.
- Tools.
- Budget.
- Step 1. Pick up materials from the hardware store.
- Step 2. Sand your DIY piece.
- Step 3. Apply oil + urethane to the top.
- Step 4. Stain the base.
- Step 5. Paint the base.
- Step 6. Second coat of oil + urethane.
- Step 7. Second base paint coat.
- Step 8. Third coat of oil + urethane.
- Step 9. Distress the base.
- Finish your next custom piece.
How to add a rustic chic finish to a side table.
Materials.
- White paint. We chose Behr Paint at Home Depot color matched to Benjamin Moore Simply White. Interior, flat / matte sheen. Or any white paint you prefer. ~$15 a quart.
- Wood stain. Varathane Early American by Rust-Oleum. ~$16.50.
- Oil & urethane mixture. Sometimes called “oil-based topcoat”. ~$25.
- Paint brush. ~$2 per brush.
- Blue shop towels. ~$2 per roll.
- Nitrile gloves. ~$0.20 per pair. We’re budgeting 5 pair ($1).
- Sandpaper sheets. ~$6 for an assorted 5-pack.
- (Optional) 8’ x 10’ Tarp.
- (Optional) Stainable wood filler.
- (Optional) Mineral spirits. Form of paint thinner used for oil-based product clean-up.


Tools.


Budget.
- All materials cost = $67.50.
- All materials cost for DIY regulars = $25.
- We already had all materials except the $25 arm-r-seal oil + urethane (oil based topcoat) by General Finishes.
Step 1. Pick up materials from the hardware store.
- Paint. Any white paint will do. We avoid bright white as it makes all other whites in the room look creamy, off-white and dingy. However, too far off-white and you’re stuck with beige or light tan.
- Stain. The usual goal of stain is to simulate a much nicer wood. Cheaper, younger lumber often yields a lighter pigment. Wood stain darkens or enriches the existing color of the wood for a fancier aesthetic.
- Oil + urethane. The oil brings out the natural color of the wood, whereas the urethane creates a protective barrier on top of the wood. This term is synonymous with “oil based topcoat”.
- Blue shop towels. These towels are ideal for applying stain and urethane because of their low lint content. Rags that haven’t been washed enough may yield a granular residue.
Step 2. Sand your DIY piece.
- Consider adding wood filler to all holes and cracks with your putty knife. Allow the putty to fully dry. Then hand sand until smooth to the touch.
- Don’t leave the splintering edges of the wood raw. Use an orbital sander to soften the rough corners and round off the sharp edges.
- Sand the legs and top with 60 grit for faster removal of material. Be careful though! Don’t push downward or risk creating a divot or a circular pattern on your piece.
- Change out the piece of sandpaper or sanding disc with 100-150 grit for more gradual removal of material and a smoother feel.
- Once the entire piece has been sanded with 100-150 grit, switch to 220 grit for a very smooth feel before adding your clear coat. Oil + urethane in this case.

Step 3. Apply oil + urethane to the top.
THE OVERVIEW
- We start with oil + urethane because urethane by itself takes 4-6 hours to dry (depending on type) before recoating is appropriate. Many oils, like boiled linseed oil, take 24 hours to dry.
- Why oil? It saturates the natural colors of your wood, making existing pigments more prominent. Warning: oils add an amber hue to all woods. If your tabletop is a lighter color and you want to avoid the ambering, then choose a water-based top coat.
- Why urethane? Protection. Your piece will scuff less, the finish will last longer, and you’ll create a plastic-like barrier on the top for a water-resistant, durable layer.
- A premixed version of oil + urethane offers the best of both worlds. Color saturation AND protection.
HOW TO APPLY IT
- Vacuum up the sawdust on your piece. Thoroughly clean off your piece with a rag or shop towel.
- Open the can of oil + urethane. Stir with a wooden paint stir stick for at least 1 minute.
- Put on your nitrile gloves.
- Grab a roll of blue shop towels. These are low-lint to avoid leaving a granular residue on your wood.
- Apply a thin, even coat of oil + urethane to the top and top edges of your piece of furniture.
- Remove drops, drips and inconsistencies WITHOUT rubbing it in. Aim for an even shine.
- Let the top dry for 24 hours in normal conditions (at least 70ºF and less than 50% relative humidity). Allow a longer dry time for nonideal conditions.

Step 4. Stain the base.
- Open your can of wood stain.
- Thoroughly mix with a wood paint stir stick for at least 1 minutes. Make sure to remove all caked stain from the base of the can.
- Using a new shop towel, apply a generous amount of stain to the base of the piece of furniture. Rub it into every exterior face, edge and crevice. No need to stain parts that will never be seen. If your piece has drawers, consider ONLY staining the drawer fronts and drawer front-edges.
- Allow the stain to penetrate the wood grain for 5-10 minutes before removing.
- Grab a new shop towel and remove ALL leftover stain. The stain color will slightly lighten as the unabsorbed liquid is transferred to the shop towel.
- Allow the stain to dry for at least 1 hour in ideal conditions. Read the manufacturer instructions and guidelines for product variance.
- If the stain isn’t dark enough, consider adding another coat after the first coat dries.

Step 5. Paint the base.
- After the stain on the base fully dries, add your first coat of paint to the base.
- Open your can of paint and thoroughly mix with a wooden paint stir stick for at least 1 minute to avoid sheen splotches (noticeable shiny vs. not shiny parts).
- Apply the paint to the base with a clean paint brush. Add a thin-medium, even coat.
- You only need to cover the areas that will be seen. Paint drawer fronts and drawer front-edges.
- After you’re finished applying paint, slowly inspect every part of the furniture piece for paint drips. Feather out all drips with your paint brush.
- Allow the paint to dry for at least 1 hour in ideal conditions. Check your product’s manufacturing instructions to be sure this dry time applies to your specific product..
- Clean out your brush with water and dry with a towel. Or wrap the brush in a plastic bag and place in the fridge (one of our favorite tips for preventing paint from drying on paint brushes and rollers in between coats) if you’re planning to apply the second coat within the next couple hours.

Step 6. Second coat of oil + urethane.
- After the 24 hour dry time, apply your second coat of oil + urethane. You’ll know it’s dry with it isn’t tacky to the touch.
- For better adhesion, lightly and evenly sand the tabletop with 220 grit (anywhere between 220-400 grit).
- Clean the sanding dust with a new shop towel.
- Apply your second coat of oil + urethane with a new shop towel. If it’s too thick, it will take much longer to dry.
- Let dry another 24 hours.
Step 7. Second base paint coat.
- Once the base paint is dry, apply your second coat of paint.
- Clean off the base with a shop towel. The dust from the tabletop may fall to the base of the piece.
- Re-stir the can of paint as the components can separate between uses.
- Apply a second coat with your paint brush.
- Check for drips.
- Let dry at least 1 hour.
Step 8. Third coat of oil + urethane.
- Repeat Step 6.
- Hand sand the tabletop with 220 grit sandpaper.
- Clean up the dust with a clean shop towel.
- Mix your can of oil + urethane.
- Apply your third coat with a new shop towel.
- Allow the coat to dry 24 hours before handling. Wait 7-10 days before light use. 30 days before heavy use (for a full cure).
Step 9. Distress the base.
- Allow the final coat of oil + urethane to dry at least 24 hours before hand-sanding the base to avoid dust getting permanently stuck in your tabletop.
- The goal is to allow the stain to slightly and sporadically show through the white paint.
- Do NOT use your orbital sander. One brief touch can remove both coats of paint AND your stain to reveal the raw wood underneath. Not ideal.
- With 220 grit sandpaper, hand sand the corners and edges of the base.
- Aim for an aesthetic that appears like it naturally happened overtime due to wear and tear.
- We limit face sanding as the faces are usually the last part of the piece to naturally weather and age.
- Clean up all dust.
- Leave the piece of furniture in ideal conditions for 7-10 days before light use.


Finish your next custom piece.
Don’t stop the creativity. You know those few furniture / decor pieces in your home just beckoning to be refinished. Or perhaps you’ve got the woodworking itch. Here’s some inspiration for your next home project. Make something beautiful.


